


Building a Reusable Casting Deck
Following years of going through absurd amounts of melamine in our shop, we decided we needed to switch to reusable casting decks. The limitations of the size and the durability of melamine, coupled with the cost of the material, meant that it no longer truly served the needs of our studio. We were spending $1,000 per month during a slow month on melamine, the pieces we were making often required that we seam material together, and we were producing way more trash than we were proud to admit.
Our first reusable deck was covered in 5'x12' sheets of laminate, and the overall dimension of our primary decks were 5'x25', with some connected decks for oversized pieces. This served us well for a period of time. Eventually the seams between the materials limited the space we had to cast on. The material cost to set up the laminate was roughly $1,000, and it served us for a year. We were already saving money.
Our next covering was Corian. This was a great material to work with. It was easily sanded between castings, and produced a nice finish. The Corian sheets we used were only 30" wide, so the seam between the sheets eventually became problematic. We have since learned of 60" wide sheets, which would be a great material to use for a reusable surface.
Our most recent surface is an epoxy coated deck. We were casting multiple 72" circular tables, and we had trouble finding a sheet good that we didn't have to seam together to meet this footprint. We gave a run with some 6' wide polycarbonate sheets, but weren't crazy about the long term durability of the material, especially its sensitivity to solvents. Our primary deck was 6'+ x 20', and we wanted something that was truly seamless. We used an epoxy, and this deck has served us well for a good many years. We are able to wet polish the back sides of pieces, and there is not alot of work that needs to happen between castings apart from a buffing with a non woven pad on a wet polisher.
I get asked regularly how we went about making this deck, so here is a basic overview of the process. Mind you, this is not the way you have to go about the process. There are now many iterations and improvements artisans have made in their own shop using this basic process, but it can serve as a useful guide.
1. Build a flat surface. The more time you work on making the deck flat, the better your long term results will be. We used 'sleeper joists' and built a basic skeleton above that with 8" rips of ply on 8" centers. We used large casters on the bottom to allow the table to be carted around the shop. Use a quality 3/4" plywood to skin the top, it does not need to be marine grade as you will be coating it with epoxy.
2. Get some epoxy. We used an epoxy called 'Product One Epoxy' from epoxy.com. People have used many different types of epoxy, and there is no real rule as to which you must use. A good garage floor epoxy would likely suffice. Dusty Baker of StoneCrete Artistry used a clear epoxy as the final coat, which allowed him to draw a grid on the surface below the epoxy. This is a very clever idea, and significantly simplified the layout process of molds. That is one clever dude!
3. Ease the corner of your deck. This will make better sense in a moment. A quick 1/4" chamfer is all you need across the top corner of your deck, as well as the bottom corner.
3. Apply your first coat. The first coat is intended to penetrate the wood for protection. Go across the top and sides of your casting deck.
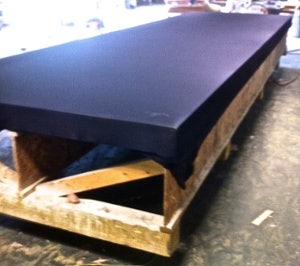 4. Stretch Spandex over the whole deck. Once the first coat is tack free, you are going to stretch spandex over the whole deck, and staple it underneath the edges of the deck. This is the reason you eased the edges already, to avoid ripping the spandex. Why spandex? Because it is awesome. There are also a few more reasons. Spandex in particular stretches in all directions, unlike other fabrics. The spandex will span any valleys in your table. The most important function of the spandex is to let you know when you are wearing through your surface before you actually get through to your wood. Stretch it as tight as you can.
5. Apply coverage coat of epoxy over the Spandex. This one is not your final coat, but just allows you to get good coverage.
6. Apply final coat. This is your finished surface. The epoxy we used goes on pretty thick, and does a good job of self leveling. We did a calculation of how much material we needed to get the manufacturers recommendation on millage (50mil I think) so we didn't end up with too little or too much material. We rolled it to get relatively even coverage, then allowed it to self level.
7. Let it cure. We gave a few days for the epoxy to fully cure before we did anything else. Doing this on a Friday is not a bad idea.
8. Sand away the flies. It doesn't matter when or where you do this, bugs are going to get stuck in the surface. Just sand them off. We went over the whole top with a planetary polisher, starting at 100 grit diamonds, up to 400 grit.
9. Season the surface. most good casting decks are like a cast iron skillet. It takes a few castings before it really starts letting go of the concrete easily. Give the deck a few coats of wax, buffing well between applications. We follow that with our favorite mold release prior to casting- vaseline cut with mineral spirits. A few coats of this are applied on the first casting, eventually you will only need one thin application. Be careful not to leave a bunch of vaseline built up on the surface, this will show in your casting!
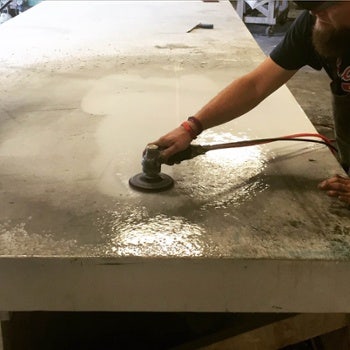 10. Keep up with it. The best way to treat the surface between castings is to give the surface a once over with a NWA pad on a wet polisher. We use our planetary polisher to speed up the process. Once you see the black of the spandex showing up, it is time for a recoat. Sand the top, and repeat step 6.
11. Take a friend to dinner. All the money you save not buying melamine, take a friend to dinner.